Sunday, 5 May 2013

Final Animation Piece

I had trouble syncing the track to the images as I wanted the waves to burst out every time the word 'SUN' was sang. However I feel that I have achieved this effect well and giving it a more abstract feel.
I wanted to keep to my final storyboard idea by having a 3 colour theme throughout the animation due to the fact that I believe it fits well with the title of the song - "SUN".


Saturday, 4 May 2013

Practice Animation Clips

I first experimented on After Effects using different tools such as 'Bezier Warp' & 'Sound Keys' to create the shapes which have been shown in the past posts. I first found it difficult to work AE but after the tutorials and you tube videos I quickly learnt my way around this software.

With this clip I had trouble getting rid of the red cross lines which is across the animation, as well as the audio waves for the 'Sound Keys' effect.  But after watching videos online I realised I could add an adjustment layer which protrudes these issues. 


This clip has the same problem as above where the red lines are over the top of the animation. The idea of this clip was to create a galaxy with the stars moving around with the music. However I felt like it was too obvious to the subject matter. 


3 Colour Shape Animation

For the beat of the track 'SUN' I wanted to created an abstract visual piece using 3 different colours. As the tune is very random with its high upbeat tempo. 

For these clips I created a 3 colour stripe which moved across the screen and resembled different shapes. As well I added a camera in after effects to pan around the clip to give it a 3D feel. 


The idea behind this clip is for the beat to sync with every new square thats appears. I used the camera tool to get the feel that the viewer was following the strips.


I used the 'Bezier Warp' effect to change the shape of the strips, this created this abstract feel. 

Friday, 3 May 2013

Sun Waves

In my initial storyboard I wanted to create an echo effect that would fit in with the tracks repeat of the word SUN. So I created a sound wave effect which would go off every time the word SUN was sang in the song. I used the tool "Sound Keys" which abled me to sync the song with the sound waves accurately.


Spinning Globe

After creating my storyboard I then began working on After Effects experimenting using different techniques, which were showed to us though a series of tutorials. 
I wanted to created a 3D looking sphere which could represent the sun, as it's the title of the song. 
So I took my inspiration from the BBC news opening titles, as it reminded me of radio waves and I believed it would go well with the beat of my track. 


As a result I tried to recreated this effect in After Effects using a three colour scheme which represents the colour of the sun. Whilst in AE I found a tool called "CC Sphere" which created a 3D sphere, I then animated it by making the lines move down to recreated the wave effect.


Saturday, 20 April 2013

Final Story Board

For my final story board I have taken some inspiration from my initial storyboard and kept the ripple wave effect but twisted it slightly. I have now added the word SUN and made the ripple to come out from that. I have also kept a 3 colour scheme throughout as I believe it fits in with the title of the song. 

For this section I want to create small sculptures which the camera can pan around creating a 3D illusion. 

 I wanted to keep the spinning sun that was first thought off in my initial storyboard. So in this idea I want to create a 3D globe where the camera comes out from the reveal the whole movement. It will finish by 3 dots vanishing.   

Monday, 15 April 2013

Initial Storyboard Idea

For the track 'Sun' I have come up with an abstract piece which I believe will works well as a visual media. 


The track has an echo effect at the start using the word sun so I thought for every beat of this I would use the visual of a water ripple... Like a sound wave. From this, the track gets very repetitive and has a happy upbeat nature to it. So I thought of trying the media light exposure and use them to create patterns which could look like the sound if it was a image. 

Wave Animation Test

I wanted to experiment using the track over the top of some visual images. So i decided to visit the beach and film a short clip of the waves coming onto the shore and crashing against a rock. This is because it is a tranquil scene and I believe goes well with the music.


As well I tried a bit of stop motion by playing with shapes in the sand.

Saturday, 13 April 2013

Digital Animation Tests

I created a few digital sun animations to get an idea of how this process is done.
I found it takes a long time to create a small 1-2 second video.


I found this last animation more difficult as I had to keep the sun on the same plane, so that the sunrise looked correct. As well the timing could be quicker so it flows better. 

Experimentation 2

An alternate idea I thought about when listening to this track was a ripple effect in the water which creates waves. This goes well with the track as each ripple could represent the echo effect of the word 'sun'. Then the waves can crash against a rock which would represent each beat. 


I was thinking of using a range of media to create this piece such as single flow video for the waves crashing against the rocks and digital animation to create the ripple effect of the water. 


Experimentation 1

I began to think of possible themes which could represent the track 'SUN'. I found this difficult to begin with as the song was quite random, meaning I couldn't pin down one particular idea I wanted to stick with. 

However I started to really listen to the beats in the track and putting pen mark when I heard them. From this I started to see a pattern in the diagrams I was drawing: 


I noticed that at the start of the song there was an echo effect using the word 'SUN'. So I tried to recreate this effect by using an orange circle to represent the sun and make it bigger every beat. 


Following the echo idea I thought about how the pattern I was creating looked similar to that of the solar system. How the sun could be in the middle and the sound waves could represent the rings where the planets orbit. 
I particularly like this idea and it means I can experiment using different methods such as stop motion and light exposure. 


Wednesday, 10 April 2013

Spitballing Ideas

After hearing the track I started to create a mind map of ideas which are relevant to the track.
I first spitballed with the word SUN and what it means to me. I then started to throw ideas of topics which would suit this particular piece of music.  

Sun Spider Diagram

Sun Spider Diagram 2


Print To Pixel - SUN

For my Print to Pixel brief I have been given the audio soundtrack -  SUN


My first impression to this track were that it was a very bubbly track which gave me the impression of: 
Dancing,
Travelling,
Bouncing,
Holidays.


Thursday, 7 March 2013

Zine Research

In order to get a some inspiration for creating my own zine I did some research, looking at the layout and the way it is presented. 


I particularly like the way this illustration of a school bag has been edited using photoshop, as the colour goes out from the outlines of the sketch.  I would like to use this technique when adding colour to my sketches.


I like these sketches as they are very simple yet effective and work well against the plan white background. I would like to include some fine liner sketches within my own zine, maybe of the people interacting around castle markets.


Feedback From The Target Audience

This email was sent from a class of year 1 students who gave me feedback on my final pop up book. They found it very interactive and enjoyed the characters which I designed. The would like me to send them the original book so they can experience the full aspect of this book. 

Hi Tom have shown your pictures of the pop up book to the Headteacher, Geography co-ordinator and two classes of  5 and 6 year olds!
Many positive comments including "Has he thought of publishing this book and using it in schools?"
The children were very keen to see the original book so I have promised them that you will come in and show them!
Some of the comments were as follows;
" I think the book is suitable for children over 3."
" It will help people to learn about the different landmarks in each city."
" It would be a fun book to have in school."
" It was interesting to look at."
" I thought it was lovely."
" It was colourful."
" I liked the Aborigional painting that Tommy did."
" I recognised London Bridge."
" I sae the Statue of Liberty."
" I saw the 'Gherkin' and I've been inside it too!"
" Can we have some other countries and cities like Blackpool (!), Russia, Wales, Scotland, Spain etc."
The children suggested that you did another book about Great Britain and they thought you could add more information about each buiding and landmarks!
If it was to be sold they thought £20 to £25 was reasonable and some thought as much as £60 because of all the hard work that you have put into it!
They liked the fact that it was real characters so they may want to meet Tommy, Haydn, Gaz, Alex and Mark!
One little boy from my class was so inspired that when he changed his reading book he picked one about 'All round the city' and said he wanted to find
out more!
Thanks for sharing this wonderful resource with us.


Monday, 4 March 2013

Final Pop Up Book

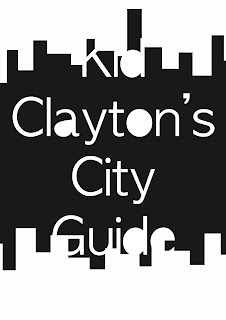
KID CLAYTON'S CITY GUIDE


Final Front & Back Cover

After receiving feedback from my initial ideas, I had a clear idea of how I wanted my final front and back cover to look like. I ended up following the feedback and created the front and back cover to look similar to each other. I added the diagonal writing to the front cover and outlined the text to make it stand out more. As well I added a speech bubble coming from the statue of Liberty with the blurb which creates a childish cartoon effect. 


Development Cover Ideas

I produced a few ideas for the front and back cover on photoshop and sent them off to a group of my target audience who gave me feedback on them. I found this helped greatly as they were able to tell me which they believed was more suited to my target audience. As well as pointing out parts which could be improved within the layout.

The feedback given back to me was that they didn't particularly like 1,2,3 as they didn't believe it was in keeping with the childish nature that the rest of the book portrays. 
However they particularly liked 4,5 as they could see some of my illustrations that come through the text. As well they thought the diagonal writing across the page was "Cool" as it shows random words which describe me as a designer as well as include the title which stands out using a bold red colour. 

Overall they believed that number 4 should be further added to, by using the diagonal random text in the background as it will be the same as the back cover. Were as number 5 should be the back cover and include the blurb/more relevant information. This is so the reader will be able to see what the book is about.  

1.

2.

3.

4.

5.


Front & Back Covers Ideas

As an experiment I tried to quickly come up with a front cover using my characters and make a catchy name 'The Teenagers Troublesome Travels' . Yes! it does keep to the illustration and child like nature with the rest of the book, however I don't particularly like the title or the grid layout. Probably because it isn't Artsy Fartsy enough!! 


So now that I have finished the interior for the book, I now need to create the books front and back cover. This is something that must still be in keeping with the illustration inside of the book, as well as being interesting to entice the reader.
I have come up with a few title names which use my logo name, so the reader will know who the author is. I particularly like "Kid Clayton's City Guide" - this is because it reminds me of a travellers guide and will teach the readers about the geography of each city. 


I have decided on the "Kid Clayton's City Guide" name, so I then tried a few sketches working out the layout of the front and back. I found this difficult at first as I needed the page to keep to the targets audience age range. But I will try a few experimentations using photoshop to create an interesting front and back cover.


Final City Pages

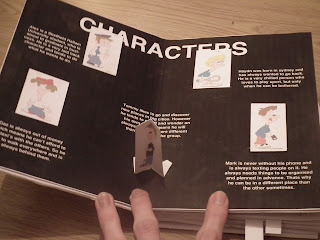
After a long time developing the idea, I have finally finished each individual page. These pages have a different city on it and have my own illustrations of the monuments found in these cities, as well as the characters being hidden somewhere within. I have added a small story of what has happened within each page, this is so the readers will be interested and want to find the character that is lost. As well I have added a 'Characters' page which shows a picture of them and gives a brief description of who they are. This is so the audience can read it and become more interacted with the book, as they may have a favourite? 
I am very pleased with each final page as it shows a variation of areas which I enjoy about design such as: Illustration, Character creating and 3D paper engineering. 

Characters


1) Sheffield


2) London


3) Paris


4) New York


5) Sydney